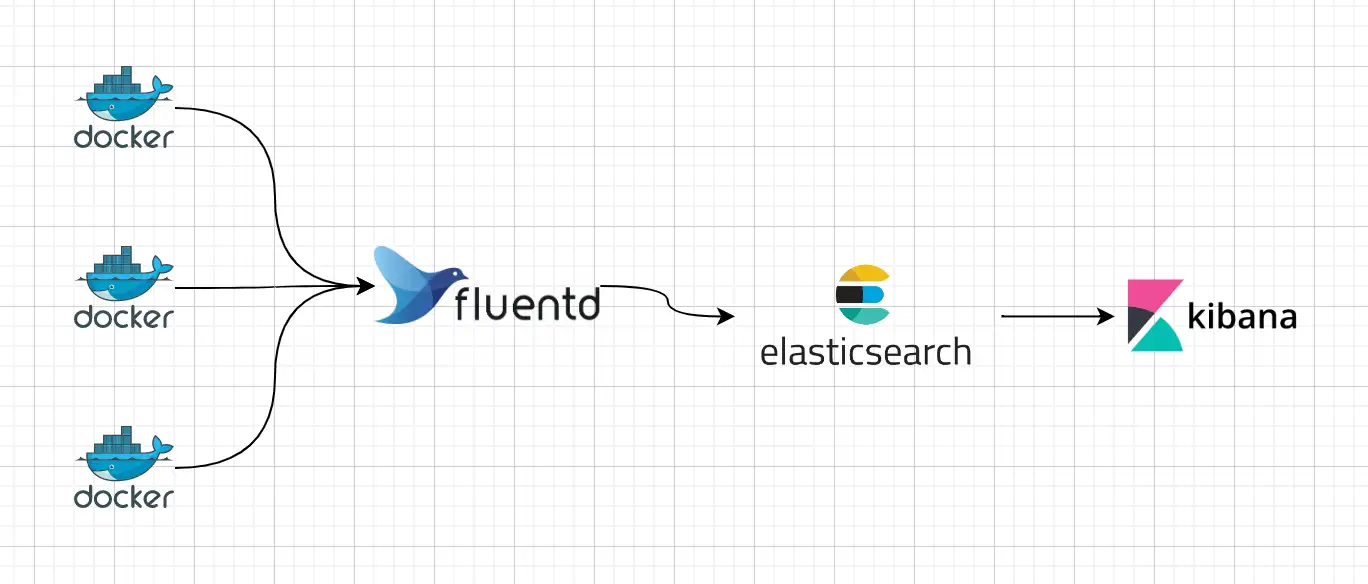
整体架构
如下图,容器产生的 stdout 日志通过 Fluentd 分发到 ElasticSearch 的不同索引,然后通过 Kibana 进行可视化查询、搜索等。
部署
ElasticSearch & Kibana
笔者使用的是docker-compose方式部署的 ES 集群和 Kibana,参考文件如下:
目录结构
1
2
3
4
5
| >ls -al
drwxr-xr-x 2 root root 4096 9月 18 14:45 .
drwxr-xr-x 7 root root 4096 9月 15 14:50 ..
-rw-r--r-- 1 root root 7956 9月 16 14:18 docker-compose.yaml
-rw-r--r-- 1 root root 776 9月 16 13:43 .env
|
.env 配置文件内容
1
2
3
4
5
6
7
8
9
10
11
12
13
14
15
16
17
18
19
20
21
22
23
24
25
26
27
28
29
30
|
ELASTIC_PASSWORD=
KIBANA_PASSWORD=
STACK_VERSION=8.4.1
CLUSTER_NAME=docker-cluster
LICENSE=basic
ES_PORT=9200
KIBANA_PORT=5601
MEM_LIMIT=1073741824
|
docker-compose.yaml 文件内容
1
2
3
4
5
6
7
8
9
10
11
12
13
14
15
16
17
18
19
20
21
22
23
24
25
26
27
28
29
30
31
32
33
34
35
36
37
38
39
40
41
42
43
44
45
46
47
48
49
50
51
52
53
54
55
56
57
58
59
60
61
62
63
64
65
66
67
68
69
70
71
72
73
74
75
76
77
78
79
80
81
82
83
84
85
86
87
88
89
90
91
92
93
94
95
96
97
98
99
100
101
102
103
104
105
106
107
108
109
110
111
112
113
114
115
116
117
118
119
120
121
122
123
124
125
126
127
128
129
130
131
132
133
134
135
136
137
138
139
140
141
142
143
144
145
146
147
148
149
150
151
152
153
154
155
156
157
158
159
160
161
162
163
164
165
166
167
168
169
170
171
172
173
174
175
176
177
178
179
180
181
182
183
184
185
186
187
188
189
190
191
192
193
194
195
196
197
198
199
200
201
202
203
204
205
206
207
208
209
210
211
212
213
214
215
216
217
218
219
220
221
222
223
224
225
226
227
228
229
230
231
|
version: "3"
services:
setup:
image: elasticsearch:${STACK_VERSION}
volumes:
- certs:/usr/share/elasticsearch/config/certs
user: "0"
command: >
bash -c '
if [ x${ELASTIC_PASSWORD} == x ]; then
echo "Set the ELASTIC_PASSWORD environment variable in the .env file";
exit 1;
elif [ x${KIBANA_PASSWORD} == x ]; then
echo "Set the KIBANA_PASSWORD environment variable in the .env file";
exit 1;
fi;
if [ ! -f config/certs/ca.zip ]; then
echo "Creating CA";
bin/elasticsearch-certutil ca --silent --pem -out config/certs/ca.zip;
unzip config/certs/ca.zip -d config/certs;
fi;
if [ ! -f config/certs/certs.zip ]; then
echo "Creating certs";
echo -ne \
"instances:\n"\
" - name: es01\n"\
" dns:\n"\
" - es01\n"\
" - localhost\n"\
" ip:\n"\
" - 127.0.0.1\n"\
" - name: es02\n"\
" dns:\n"\
" - es02\n"\
" - localhost\n"\
" ip:\n"\
" - 127.0.0.1\n"\
" - name: es03\n"\
" dns:\n"\
" - es03\n"\
" - localhost\n"\
" ip:\n"\
" - 127.0.0.1\n"\
> config/certs/instances.yml;
bin/elasticsearch-certutil cert --silent --pem -out config/certs/certs.zip --in config/certs/instances.yml --ca-cert config/certs/ca/ca.crt --ca-key config/certs/ca/ca.key;
unzip config/certs/certs.zip -d config/certs;
fi;
echo "Setting file permissions"
chown -R root:root config/certs;
find . -type d -exec chmod 750 \{\} \;;
find . -type f -exec chmod 640 \{\} \;;
echo "Waiting for Elasticsearch availability";
until curl -s --cacert config/certs/ca/ca.crt https://es01:9200 | grep -q "missing authentication credentials"; do sleep 30; done;
echo "Setting kibana_system password";
until curl -s -X POST --cacert config/certs/ca/ca.crt -u "elastic:${ELASTIC_PASSWORD}" -H "Content-Type: application/json" https://es01:9200/_security/user/kibana_system/_password -d "{\"password\":\"${KIBANA_PASSWORD}\"}" | grep -q "^{}"; do sleep 10; done;
echo "All done!";
'
healthcheck:
test: ["CMD-SHELL", "[ -f config/certs/es01/es01.crt ]"]
interval: 1s
timeout: 5s
retries: 120
es01:
depends_on:
setup:
condition: service_healthy
image: elasticsearch:${STACK_VERSION}
volumes:
- certs:/usr/share/elasticsearch/config/certs
- esdata01:/usr/share/elasticsearch/data
ports:
- ${ES_PORT}:9200
environment:
- node.name=es01
- cluster.name=${CLUSTER_NAME}
- cluster.initial_master_nodes=es01,es02,es03
- discovery.seed_hosts=es02,es03
- ELASTIC_PASSWORD=${ELASTIC_PASSWORD}
- bootstrap.memory_lock=true
- xpack.security.enabled=true
- xpack.security.http.ssl.enabled=true
- xpack.security.http.ssl.key=certs/es01/es01.key
- xpack.security.http.ssl.certificate=certs/es01/es01.crt
- xpack.security.http.ssl.certificate_authorities=certs/ca/ca.crt
- xpack.security.http.ssl.verification_mode=certificate
- xpack.security.transport.ssl.enabled=true
- xpack.security.transport.ssl.key=certs/es01/es01.key
- xpack.security.transport.ssl.certificate=certs/es01/es01.crt
- xpack.security.transport.ssl.certificate_authorities=certs/ca/ca.crt
- xpack.security.transport.ssl.verification_mode=certificate
- xpack.license.self_generated.type=${LICENSE}
mem_limit: ${MEM_LIMIT}
ulimits:
memlock:
soft: -1
hard: -1
healthcheck:
test:
[
"CMD-SHELL",
"curl -s --cacert config/certs/ca/ca.crt https://localhost:9200 | grep -q 'missing authentication credentials'",
]
interval: 10s
timeout: 10s
retries: 120
es02:
depends_on:
- es01
image: elasticsearch:${STACK_VERSION}
volumes:
- certs:/usr/share/elasticsearch/config/certs
- esdata02:/usr/share/elasticsearch/data
environment:
- node.name=es02
- cluster.name=${CLUSTER_NAME}
- cluster.initial_master_nodes=es01,es02,es03
- discovery.seed_hosts=es01,es03
- bootstrap.memory_lock=true
- xpack.security.enabled=true
- xpack.security.http.ssl.enabled=true
- xpack.security.http.ssl.key=certs/es02/es02.key
- xpack.security.http.ssl.certificate=certs/es02/es02.crt
- xpack.security.http.ssl.certificate_authorities=certs/ca/ca.crt
- xpack.security.http.ssl.verification_mode=certificate
- xpack.security.transport.ssl.enabled=true
- xpack.security.transport.ssl.key=certs/es02/es02.key
- xpack.security.transport.ssl.certificate=certs/es02/es02.crt
- xpack.security.transport.ssl.certificate_authorities=certs/ca/ca.crt
- xpack.security.transport.ssl.verification_mode=certificate
- xpack.license.self_generated.type=${LICENSE}
mem_limit: ${MEM_LIMIT}
ulimits:
memlock:
soft: -1
hard: -1
healthcheck:
test:
[
"CMD-SHELL",
"curl -s --cacert config/certs/ca/ca.crt https://localhost:9200 | grep -q 'missing authentication credentials'",
]
interval: 10s
timeout: 10s
retries: 120
es03:
depends_on:
- es02
image: elasticsearch:${STACK_VERSION}
volumes:
- certs:/usr/share/elasticsearch/config/certs
- esdata03:/usr/share/elasticsearch/data
environment:
- node.name=es03
- cluster.name=${CLUSTER_NAME}
- cluster.initial_master_nodes=es01,es02,es03
- discovery.seed_hosts=es01,es02
- bootstrap.memory_lock=true
- xpack.security.enabled=true
- xpack.security.http.ssl.enabled=true
- xpack.security.http.ssl.key=certs/es03/es03.key
- xpack.security.http.ssl.certificate=certs/es03/es03.crt
- xpack.security.http.ssl.certificate_authorities=certs/ca/ca.crt
- xpack.security.http.ssl.verification_mode=certificate
- xpack.security.transport.ssl.enabled=true
- xpack.security.transport.ssl.key=certs/es03/es03.key
- xpack.security.transport.ssl.certificate=certs/es03/es03.crt
- xpack.security.transport.ssl.certificate_authorities=certs/ca/ca.crt
- xpack.security.transport.ssl.verification_mode=certificate
- xpack.license.self_generated.type=${LICENSE}
mem_limit: ${MEM_LIMIT}
ulimits:
memlock:
soft: -1
hard: -1
healthcheck:
test:
[
"CMD-SHELL",
"curl -s --cacert config/certs/ca/ca.crt https://localhost:9200 | grep -q 'missing authentication credentials'",
]
interval: 10s
timeout: 10s
retries: 120
kibana:
depends_on:
es01:
condition: service_healthy
es02:
condition: service_healthy
es03:
condition: service_healthy
image: kibana:${STACK_VERSION}
volumes:
- certs:/usr/share/kibana/config/certs
- kibanadata:/usr/share/kibana/data
ports:
- ${KIBANA_PORT}:5601
environment:
- SERVERNAME=kibana
- ELASTICSEARCH_HOSTS=https://es01:9200
- ELASTICSEARCH_USERNAME=kibana_system
- ELASTICSEARCH_PASSWORD=${KIBANA_PASSWORD}
- ELASTICSEARCH_SSL_CERTIFICATEAUTHORITIES=config/certs/ca/ca.crt
mem_limit: ${MEM_LIMIT}
healthcheck:
test:
[
"CMD-SHELL",
"curl -s -I http://localhost:5601 | grep -q 'HTTP/1.1 302 Found'",
]
interval: 10s
timeout: 10s
retries: 120
volumes:
certs:
driver: local
esdata01:
driver: local
esdata02:
driver: local
esdata03:
driver: local
kibanadata:
driver: local
|
备注:因为较新版本的 Elastic 必须启用 xpack.security.enabled=true,所以 es 只能使用 https 访问。
Fluentd
笔者使用的是docker-compose方式部署,目录结构已经部署文件如下:
目录结构
1
2
3
4
5
6
7
| > tree -L 3
.
├── docker-compose.yaml
├── fluentd
│ ├── conf
│ │ ├── fluent.conf
│ └── Dockerfile
|
docker-compose.yaml
1
2
3
4
5
6
7
8
9
10
| version: "3"
services:
fluentd:
build: ./fluentd
volumes:
- ./fluentd/conf:/fluentd/etc
- /var/log/container:/fluentd/log
ports:
- "24224:24224"
- "24224:24224/udp"
|
fluent.conf
1
2
3
4
5
6
7
8
9
10
11
12
13
14
15
16
17
18
19
20
21
22
23
24
25
26
27
28
29
30
31
32
|
<source>
  @type forward
  port 24224
  bind 0.0.0.0
</source>

# 匹配容器的tag
<match demo> # demo 需要更换为自己的容器的tag
  @type copy

  <store>
    @type elasticsearch
    host 172.17.0.5 # 更换为自己es的ip或者域名
    port 9200
    logstash_format true
    logstash_prefix demo # 更换为自己的prefix
    logstash_dateformat %Y%m%d
    include_tag_key true
    type_name access_log
    tag_key @log_name
    flush_interval 1s
    user elastic # 更换为自己的 es 账号
    password xxx # 更换为自己的 es 密码
    scheme https
    ssl_verify false
  </store>

  <store>
    @type stdout
  </store>
</match>
|
启动服务
笔者使用的是docker-compose方式启动的服务,参考文件如下
1
2
3
4
5
6
7
8
9
10
11
12
13
14
15
16
17
| version: "3"
services:
demo:
environment:
TZ: Asia/Shanghai
image: "nginx:latest"
restart: always
labels:
- "aliyun.logs.observer=stdout"
logging:
driver: "fluentd"
options:
fluentd-address: "172.17.0.5:24224"
mode: "non-blocking"
tag: "demo"
|
效果参考
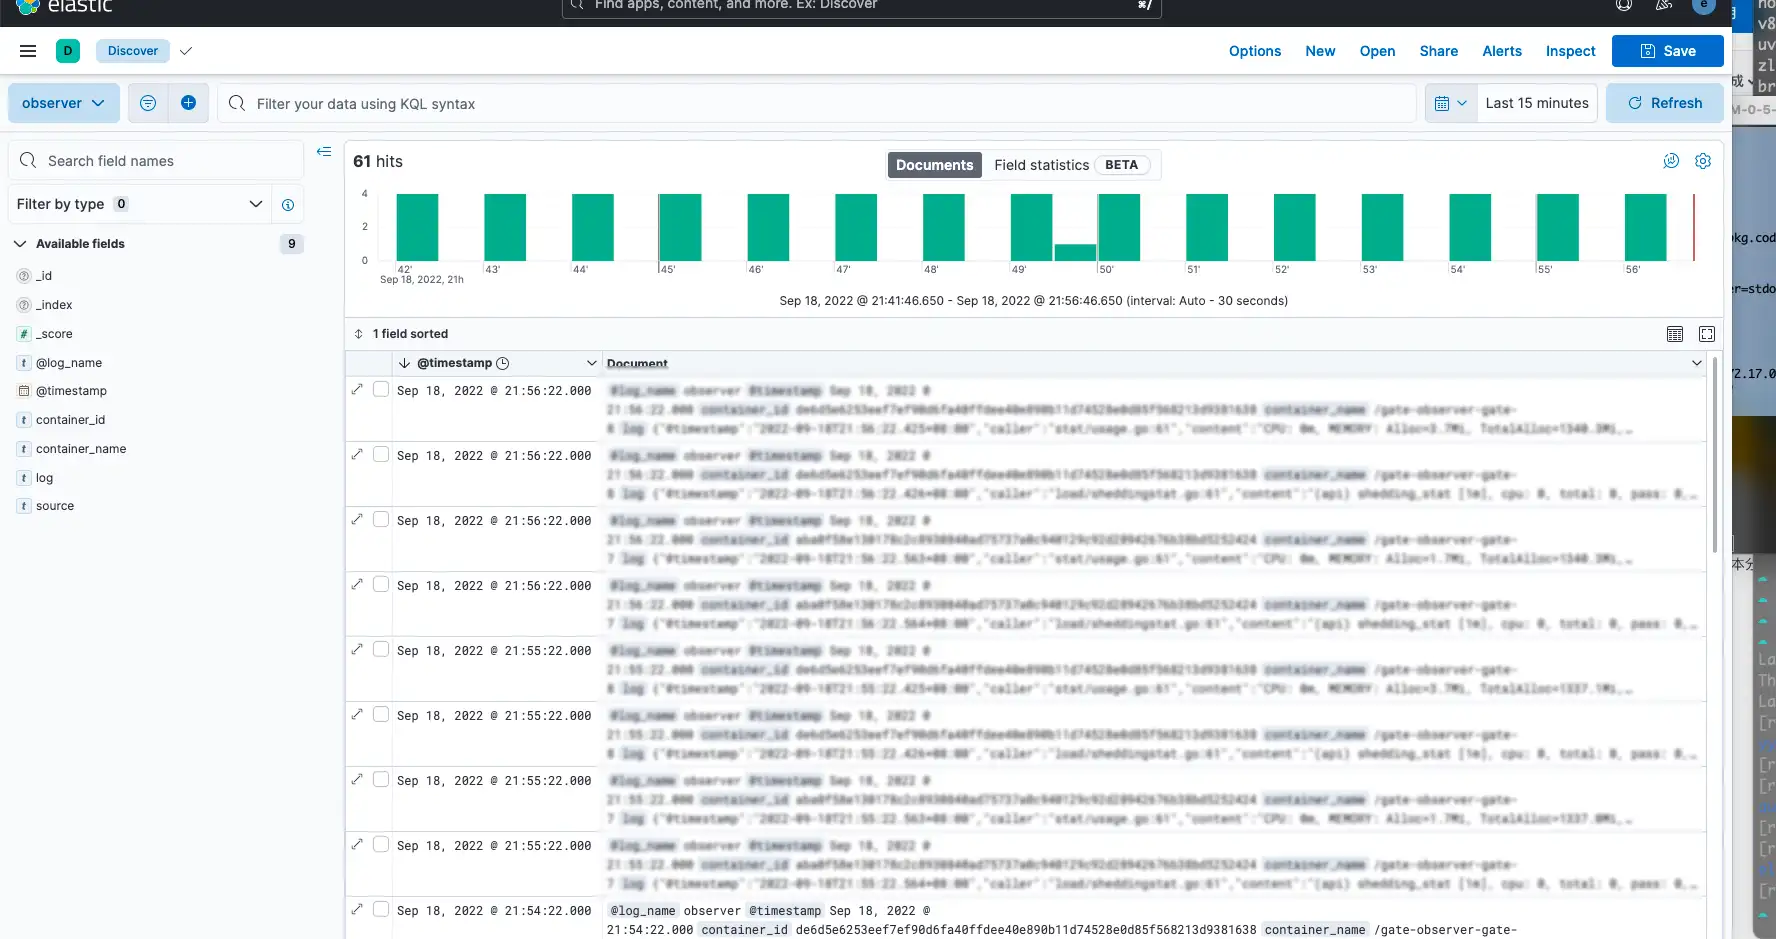
登录你的 Kibana 可以在管理界面的 Data Views 看到通过 Fluentd 配置生成的索引
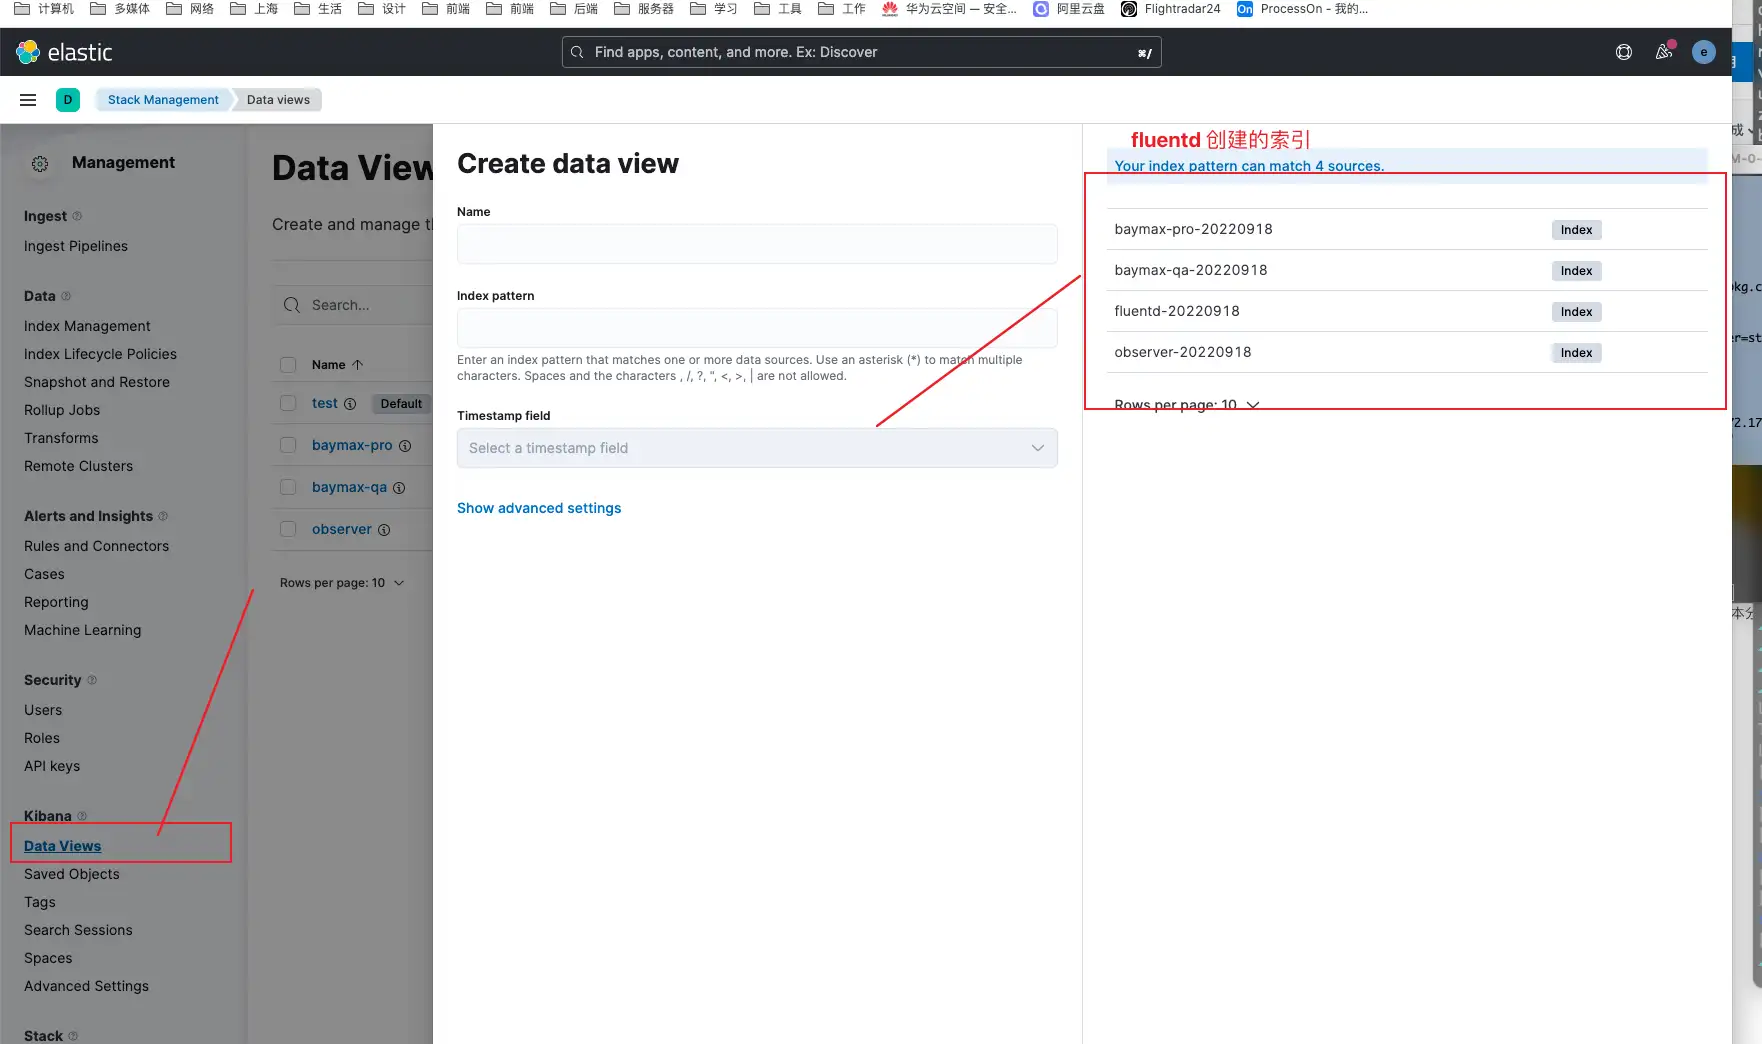
选择你需要的索引创建一个 Data view 便可以去 discover 菜单查询收集到的日志了